Battery Guide: 2025 Harley-Davidson Tri Glide Ultra FLHTCUTG
Battery Guide: 2025 Harley-Davidson Tri Glide Ultra FLHTCUTG
The Tri Glide Ultra asks more of its battery than any two-wheel Harley in the lineup. Reverse motor, electric locks, full audio, heated grips, a loaded fairing, and a chassis that spends a lot of its life idling in parade gear and parking lots. When the battery on a trike gets weak, you feel it first in the reverse — slow, groaning, or dead — long before the engine refuses to crank. Treat that as your early warning.
This guide covers testing, replacing, charging, and storing the battery on a 2025 FLHTCUTG.
Quick Reference Table
| Spec | Value | Notes |
|---|---|---|
| Battery Type | Sealed AGM (Absorbed Glass Mat), maintenance-free | Factory fitment on current Touring/Trike platform |
| Nominal Voltage | 12V | Negative ground |
| Fully Charged Resting Voltage | 12.6V – 12.8V | Measured after 2+ hours off charge |
| Discharged Threshold | Below 12.4V | Recharge before use; below 12.0V is deeply discharged |
| Group Size | Verify against your owner's manual or dealer | Touring-class AGM; confirm before ordering |
| OEM Part Number | Verify against your owner's manual or dealer | No Harley OEM number is confirmed in our catalog data for this model year |
| Cold Cranking Amps (CCA) | Verify against your owner's manual or dealer | Do not under-spec — the reverse motor draws hard |
| Reserve Capacity | Verify against your owner's manual or dealer | — |
| Dimensions (L x W x H) | Verify against your owner's manual or dealer | Measure the tray before buying an "equivalent" |
| Weight (approx) | Verify against your owner's manual or dealer | Expect a heavy unit; lift with two hands |
| Terminal Type | Threaded post with bolt-through cable lug | Standard H-D Touring style |
| Terminal Layout | Confirm orientation before removal — photograph it | Cable length will only reach one way |
| Charging System Output (running) | Roughly 13.8V – 14.8V at 3000 RPM | Confirm exact spec in your service manual |
| Replacement Interval | 3 – 5 years, climate and use dependent | Florida heat shortens this; so does short-trip riding |
Difficulty & Time Estimate
- Skill level: Beginner. If you can run a socket wrench and tell red from black, you can do this job.
- Time: 25 – 40 minutes for a rider who's been in there before. 45 – 60 minutes the first time, mostly spent figuring out the bodywork.
- Tools at hand: Everything on the list below is ordinary garage stock. The one thing worth buying if you don't own it is a decent multimeter — it turns "I think the battery is bad" into a number you can act on.
- Conditions: Work above 40°F if you can. Cold makes fasteners stubborn and makes a healthy battery read weak.
- Trike note: The Tri Glide sits on three wheels, so there's no jiffy stand balancing act. Park it level, set the parking brake, and it stays put. That's the one part of this job that's easier than on a Road Glide.
Tools Required
| Tool | Purpose |
|---|---|
| Torx driver set (T25 / T27 typical) | Bodywork and cover fasteners on Touring-family panels |
| Socket wrench with 10mm and 3/8" sockets | Terminal bolts and hold-down hardware |
| Short extension and/or stubby ratchet | Reaching terminal bolts in a tight tray |
| Digital multimeter | Resting voltage, charging output, and voltage drop checks |
| Battery terminal brush | Cleaning corrosion off posts and cable lugs |
| Baking soda and water solution | Neutralizing acid residue in the tray |
| Shop rags and a stiff brush | Cleaning the tray and cable ends |
| Dielectric grease or terminal protectant | Sealing the connections against corrosion |
| Safety glasses and nitrile gloves | Acid and spark protection — not optional |
| Torque wrench (in-lb range) | Terminal and hold-down fasteners, if you have the spec |
| Memory saver (optional) | Preserves radio presets and clock settings |
| Smart AGM battery tender | Charging the new battery and maintaining it afterward |
Battery Location & Access
On the 2025 Tri Glide Ultra the battery lives low in the frame on the left side of the machine, in a molded tray behind removable bodywork — the same general arrangement the Touring platform has used for years, adapted around the trike's rear body and Tour-Pak mounting.
What has to come off first depends on how your machine is optioned, so work in this order:
- Left saddlebag or side panel. Clear whatever covers the left flank first. On the trike this is bodywork, not a simple two-wheel side cover, and it may use more fasteners than you expect.
- Battery access cover. Behind the bodywork you'll find a cover or trim panel over the tray, usually held by Torx screws. Count them out into a magnetic tray — they're easy to lose in the frame rails.
- Seat, if the tray is blocked. Some configurations route cables or the main fuse under the rider seat. If you can't get a clean straight lift on the battery, pull the seat rather than forcing it.
Before you pull anything, check your own service manual for the exact panel sequence on your build — Tri Glide bodywork varies by options package, and there's no sense breaking a tab to save three minutes. If a panel doesn't want to come free after the fasteners are out, there's another fastener you haven't found.
Main fuse: Locate the main fuse before you start. On the Touring platform it lives in the fuse block near the battery area. Pulling it isolates the electrical system and is cheap insurance on a machine with this much accessory wiring.
Step-by-Step Replacement
Step 1 — Park and secure the machine
Level ground, engine off, key out, parking brake set. Let the engine and exhaust cool. Work somewhere ventilated and away from anything that sparks or burns — even a sealed AGM can vent hydrogen if it's been abused.
Step 2 — Gear up
Safety glasses and gloves on. Battery acid does not care how careful you usually are.
Step 3 — Remove the bodywork and battery cover
Take off the left-side bodywork and the battery access cover as described above. Bag the fasteners and label the bag. Set panels painted-side up on a soft surface — a $6 job turns into a $600 paint job fast.
Step 4 — Photograph the installation
Before a single wrench touches a terminal, take two or three clear photos: cable routing, which lug is on which post, how the hold-down sits, and where any ground straps land. This is the single best five seconds you'll spend on the job.
Step 5 — Disconnect the NEGATIVE terminal first
Loosen and remove the negative (–) cable bolt, pull the lug off the post, and tuck the cable clear of the battery.
Why negative first: the negative post is tied to the frame. With it disconnected, if your wrench slips off the positive post and touches metal, nothing happens — there's no path back to the battery. Do it the other way around and that same slip dumps the full current of the battery through your wrench. It welds itself to the frame, glows orange, and can rupture the case. Negative off first, every time.
Step 6 — Disconnect the POSITIVE terminal
Remove the positive (+) cable bolt and lug. Move the cable away from both the battery and the negative cable. If the positive terminal has a red boot, fold it back over the bare lug so it can't fall against the frame.
Step 7 — Release the hold-down
Free the strap, bracket, or retaining hardware holding the battery in the tray. Keep the hardware together — hold-down pieces are model-specific and annoying to source.
Tip: Trike tray hardware sees more vibration than a two-wheeler's. If a strap is frayed, cracked, or stretched, replace it now rather than trusting it for another three years.
Step 8 — Lift the old battery out
Grip it squarely with both hands and lift straight up. Don't pull it out by the cables or the terminals. Touring-class AGM batteries are heavy and the tray is deep — use your legs, not your back. Set the old battery upright on concrete or a plastic tray, never on a wood shelf or carpet.
Step 9 — Clean and inspect the tray
Look for corrosion, cracks, standing water, or road grit. Scrub any white or green residue with a baking soda and water solution, then rinse lightly and dry completely. Confirm the drain path is clear. Check the tray mounting studs and isolators — if the rubber is crushed or missing, the battery will hammer itself to death on the trike's rear suspension.
Step 10 — Inspect the cables and lugs
Run your hand down both cables. You're looking for cracked insulation, green corrosion creeping under the jacket, heat-discolored lugs, or a lug that moves independently of the cable. Clean both lugs with the terminal brush until they're bright metal. A corroded connection can drop enough voltage to make a brand-new battery act dead.
Step 11 — Check and charge the new battery before installing
Put a meter on the new battery. A quality AGM should read 12.6V or better out of the box. If it reads 12.4V or lower, put it on an AGM-mode tender until it's full before installing. Installing a partially charged AGM and expecting the bike's charging system to top it off is how people kill a new battery in the first month — the alternator is built to maintain a charged battery, not recover a flat one.
Step 12 — Set the new battery in the tray
Lower it in straight, seated flat, with the terminals oriented exactly as in your photo from Step 4. Confirm both cables reach their posts without stretching or bending. If a cable is under tension, the battery is in backward — pull it and turn it around before you bolt anything down.
Step 13 — Secure the hold-down
Reinstall the strap or bracket and snug the hardware. The battery should not shift at all when you push it side to side by hand.
Warning: Snug, not gorilla-tight. Overtightening a hold-down cracks the AGM case, and a cracked case means acid in your frame rails. If you have a torque figure for this fastener in your service manual, use it — otherwise tighten until the battery is immobile and stop there. Any published torque value for this specific model year should be verified against your owner's manual or dealer.
Step 14 — Connect POSITIVE first, then NEGATIVE last
Install the positive (+) cable and bolt, then the negative (–) cable and bolt. Tighten both until the lugs won't twist by hand.
Why positive first on reassembly: it's the mirror of removal. With the negative still disconnected, the frame is dead — a dropped wrench on the positive post does nothing. Connecting negative last means the very last connection you make is the harmless one. Reinstall the main fuse if you pulled it, apply a light film of dielectric grease over the finished terminals, refit the cover and bodywork, then start the trike and confirm reverse, lights, and audio all work.
Charging & Maintenance
An AGM battery is sealed and maintenance-free in the sense that you never add water. It is not maintenance-free in the sense of "ignore it."
Use a smart tender with an AGM mode. Modern microprocessor-controlled tenders read the battery and taper the charge. Leave one connected any time the trike sits more than a week. A tender costs less than a single battery and will pay for itself twice over.
Charge rate matters. AGM batteries want a low, controlled charge — a slow charge overnight beats a fast one every time. If your charger has a 2A and a 10A setting, use the 2A.
What kills an AGM battery:
- Overcharging. A dumb trickle charger with no voltage regulation will cook the electrolyte out of an AGM. Once it vents, it's gone — you can't refill it.
- Sitting discharged. Sulfation starts within days of a battery falling below full charge and becomes permanent. A battery left flat over a winter is usually finished by spring.
- Heat. Sustained high underbody temperatures accelerate internal breakdown. Hot-climate riders should expect the short end of the 3–5 year window.
- Vibration. A loose hold-down lets internal plates shed material. This is a bigger deal on a trike than most riders realize.
- Chronic short trips. Ten-minute rides pull more out of the battery for starting than the charging system puts back. If that's your riding pattern, a tender isn't optional.
- Parasitic draw. Alarms, GPS units, accessory lighting, and phone chargers wired to constant power will flatten a battery over a few weeks of sitting.
Never use an automotive jump-start box set to a high-amp boost on a motorcycle AGM, and never use a "desulfator" pulse charger on a sealed AGM unless the charger manufacturer specifically lists AGM compatibility.
Winter Storage
Even in warm states, a trike that sits for a couple of months needs a plan.
- Charge it to full before storage. A fully charged AGM resists both sulfation and freezing. A discharged battery can freeze and crack its case.
- Clean the terminals and apply dielectric grease so corrosion doesn't get a head start.
- Pick one: tender or disconnect. The better option is a quality AGM tender connected the whole time. If you have no power where it's stored, disconnect the negative cable (negative first, same rule) to kill parasitic draw, and pull the battery to a climate-controlled shelf.
- Store above freezing if you can. Cool is fine; cold is hard on chemistry, and a garage that swings 60 degrees a day is worse than one that stays cold.
- Never store a battery on bare concrete in a damp space. It's less about the concrete and more about condensation and grit on the case bridging the terminals.
- Check monthly. If it's disconnected rather than tendered, put a meter on it every 30 days. Anything below 12.4V goes back on the charger.
- Before the first spring ride, check resting voltage, confirm the terminals are tight, and cycle the reverse motor in a safe spot. Reverse is your load test.
Testing a Suspect Battery
Test in this order. Each step tells you something the previous one didn't.
1. Resting voltage. Let the trike sit at least two hours after riding or charging — surface charge will lie to you. Meter across the terminals:
| Reading | State of Charge | What It Means |
|---|---|---|
| 12.7V+ | 100% | Healthy and fully charged |
| 12.6V | ~100% | Normal full charge |
| 12.4V | ~75% | Undercharged — find out why |
| 12.2V | ~50% | Significantly discharged; recharge now |
| 12.0V | ~25% | Deeply discharged; sulfation likely started |
| Below 11.8V | Effectively dead | Recharge and test — usually replacement |
2. Load test. This is the test that matters, because a bad battery can show good voltage with no load on it. Use a carbon-pile load tester or a shop's electronic tester. Under load, the voltage should stay above roughly 9.6V at 70°F. If it collapses into the 8s or lower, the battery is done regardless of what it reads at rest.
3. Cranking voltage. Meter across the terminals while a helper hits the start button. Dropping below about 9.5V during cranking points at the battery or a bad connection. Watch it during reverse operation too — on this machine, reverse will expose a marginal battery before the starter does.
4. Charging system check. Start the engine and read across the terminals at idle, then at about 3000 RPM. You want to see charging voltage climb into the high 13s or low 14s. If it reads battery voltage or lower, the problem is the charging system, not the battery — and a new battery will die exactly like the old one did. Confirm the exact spec for your model year against your service manual.
5. Age. Find the date code on the case. Anything past five years is living on borrowed time even if the numbers look acceptable.
Replacement Parts We Stock
These are V-Twin Manufacturing parts from our catalog listed as fitting the FLHTCUTG / FLHTCU / FLHTC / FLHT family. Part numbers and prices are exactly as listed:
| V-Twin Part # | Description | Price | Category |
|---|---|---|---|
| 48-2316 | Battery Label | $4.50 | Battery / Batteries |
| 53-0566 | *UPDATE Battery Top Plug Set | $7.15 | Battery / Batteries |
| 12-0538 | Parkerized 6 Volt Battery Rod Wing Nuts | $7.92 | Straps / Battery |
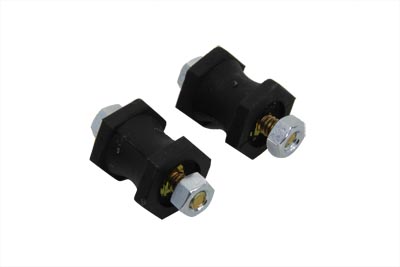
| 28-0749 | Battery Tray ISO Stud Set | $8.87 | Trays & Carriers |
| 53-0579 | Battery Top Set | $8.87 | Battery / Batteries |
| 37-0589 | Zinc Speedometer Cable Clamps | $8.87 | Cables |
| 37-9025 | Speedometer Cable Clamp | $8.87 | Cables |
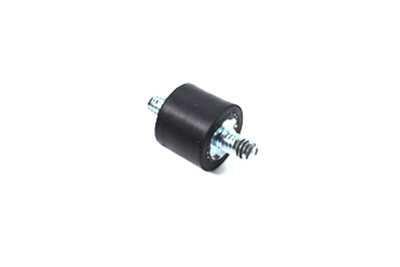
| 28-0547 | Battery Tray ISO Stud | $10.02 | Trays & Carriers |
| 12-0538 | Battery Box Wing Nut Set | $10.08 | Straps / Battery |
Fitment note: These are hardware and accessory items — trays, studs, hold-down hardware, and labels — not the battery itself. We do not list a confirmed Harley-Davidson OEM battery part number for this model year; verify the battery itself against your owner's manual or dealer before ordering. The ISO stud and stud set (28-0547 / 28-0749) are the parts most riders actually need alongside a battery swap, since crushed or missing isolators are a common find once the old battery is out. If you're ordering the wing nut hardware, confirm it matches the hold-down arrangement in your own tray before you pull the old battery — measure what's on your machine first.
Tips, Warnings & Common Mistakes
Tips that save you a callback to the dealer:
- Photograph everything before you touch it. Cable routing, terminal orientation, hold-down layout.
- Keep fasteners sorted by where they came from. Touring bodywork uses several lengths that look identical until the wrong one bottoms out in a threaded boss.
- Use a memory saver if you care about radio presets and clock settings.
- Clean the lugs, not just the posts. Corrosion hides inside the lug where you can't see it.
- On a trike, cycle reverse after the job. It's the heaviest electrical load on the machine and the best functional check you can run in your own driveway.
- Write the install date on the new battery with a paint pen. In four years you'll want to know.
Common mistakes and what they cost you:
| Mistake | Consequence |
|---|---|
| Disconnecting positive first | Wrench slip shorts to frame — sparks, welded tools, possible battery rupture |
| Connecting negative first on reassembly | Same short risk, at the moment you're least expecting it |
| Installing a new AGM without charging it first | Battery never reaches full charge, fails within months, warranty argument follows |
| Overtightening the hold-down | Cracked AGM case and acid in the frame |
| Leaving the hold-down loose | Vibration sheds internal plates; early failure, especially on a trike |
| Using a standard trickle charger instead of an AGM tender | Overcharge, vented electrolyte, dead battery you can't refill |
| Ignoring corroded cable lugs | High resistance mimics a dead battery; you replace a good battery for nothing |
| Not testing charging system output | New battery dies exactly like the old one did |
| Buying by "equivalent" size without measuring | Battery doesn't fit the tray, or terminals face the wrong way |
| Storing the trike all winter without a tender | Sulfated battery, replacement every spring |
| Prying bodywork before all fasteners are out | Broken tabs and cracked paint on an expensive panel |
Warning: If a battery case is swollen, cracked, leaking, or hot to the touch, do not charge it and do not jump it. Get it out of the machine and to a recycler.
Disposal & Recycling
Lead-acid batteries — AGM included — are fully recyclable and are hazardous waste. They do not go in household trash, and in most states it's illegal to put them there.
- Core charge. Most retailers charge a core deposit when you buy a battery and refund it when you bring the old one back. Bring the old battery with you or keep the receipt and return within the window.
- Where they're taken: Harley dealerships, any auto parts chain (AutoZone, O'Reilly, Advance, NAPA), motorcycle shops, battery specialty stores, and municipal household hazardous waste collection sites. Most take them free whether or not you bought from them.
- Transport it upright in a plastic tub or on a tray, with the terminals taped or covered so nothing can bridge them in the back of the truck.
- If it leaked, neutralize the spill with baking soda, wear gloves, and bag the contaminated rags for hazardous waste disposal rather than tossing them.
- Roughly all of the lead and plastic in a returned battery gets recycled into new ones. Returning the core is the easiest environmentally correct thing you'll do all year.
Verification Notes
We've stated only what we can stand behind. The following specifications vary by model year, build, and market — confirm each one against your own owner's manual, service manual, or dealer before ordering parts or applying torque.
| Item | Status | How to Verify |
|---|---|---|
| Harley OEM battery part number | Not confirmed in our catalog | Owner's manual, dealer parts counter, or VIN lookup |
| Battery group size | Not confirmed for this model year | Owner's manual, or measure the tray and the old battery |
| Cold Cranking Amps (CCA) rating | Not confirmed for this model year | Service manual or the label on the original battery |
| Reserve capacity | Not confirmed | Service manual or battery manufacturer spec sheet |
| Exact battery dimensions | Not confirmed | Measure the existing battery and tray before ordering |
| Battery weight | Not confirmed | Manufacturer listing for the battery you buy |
| Terminal orientation | Model-specific | Photograph your own installation before removal |
| Terminal bolt torque | Not confirmed for this model year | Service manual; otherwise snug until the lug won't twist |
| Hold-down fastener torque | Not confirmed for this model year | Service manual; otherwise snug until the battery is immobile |
| Charging system output spec | Approximate range given | Service manual electrical specifications section |
| Main fuse rating and location | Model-specific | Service manual fuse block diagram |
| Bodywork removal sequence | Varies by options package | Service manual for your specific build |
| Fitment of listed V-Twin hardware | Listed as fitting FLHTCUTG family | Compare to the hardware in your own tray before ordering |
Parts for this job
Fits FLHTCUTG, FLHTCU, FLHTC, FLHT, FLH, FL — from our catalogue of 41,000+ aftermarket parts.
 Battery Label$5.40
 *UPDATE Battery Top Plug Set$8.58
 Parkerized 6 Volt Battery Rod Wing Nuts$9.50
 Battery Tray ISO Stud Set$10.64
 Zinc Speedometer Cable Clamps$10.64
 Speedometer Cable Clamp$10.64
 Battery Top Set$10.64
 Battery Tray ISO Stud$12.02Battery Box Wing Nut Set$12.10
 Bright Chrome Battery Carrier Bracket$12.80
 Brass Battery Terminal Adapter Kit$12.80
 Zinc Battery Vent Clamp$12.80